
Key Takeaways:
- Problem Awareness: Damaged seat foam or covers don’t always require a full seat replacement; just the right parts and a few tools are needed.
- DIY Confidence: Removing a seat is a straightforward process that most truck and SUV owners can handle in their own garage.
- Smart Upgrades: Factory-matched covers from The Seat Shop are a smarter, longer-lasting alternative to dealer parts or cheap online fixes.
If you’ve ever looked at the seat in your truck or SUV and thought, “This thing’s toast,” you’re not alone. Over time, even the toughest seats wear out, foam breaks down, covers split open, and the whole thing starts to feel less like a seat and more like a problem. But before you start throwing money at a dealership or digging through a junkyard, here’s something most guys don’t realize: the seat frame itself is usually fine. You just need to remove the seat, so you can fix what actually needs fixing.
We know that because seat repair is what we do. At The Seat Shop, we craft factory-matched seat covers and replacement foam cushions that restore your interior to its original condition, with no shortcuts, no slipcovers, and no cheap Amazon knockoffs. Every product we offer is hand-cut and sewn right here in Plano, Texas. We’ve spent over a decade doing one thing really well: helping truck and SUV owners fix their seats the right way.
Why You Might Need To Remove A Vehicle Seat In The First Place
If you’re reading this, there’s a good chance the seat in your truck or SUV isn’t what it used to be. Maybe the foam’s collapsed. Maybe the vinyl’s split open like a baked potato. Or maybe you’ve just had enough of that sagging, creaking mess that’s been digging into your lower back for years. Whatever the reason, we get it. It’s not about vanity. It’s about making your truck feel solid again.
Removing a vehicle seat might sound like overkill, but let’s be real: sometimes the only way to fix the problem right is to take it all the way out. Trying to slap a patch on a torn seat or jam some foam under a worn-out cushion is a temporary fix. And those cheap universal seat covers you’ll find on Amazon? Let’s just say they don’t belong anywhere near a vehicle you actually care about.
Whether you’re replacing the seat cover, swapping out damaged foam, or upgrading to something that actually fits like the factory intended, the first step is getting the seat out. And it’s a lot easier than most guys think.

What You’ll Need Before You Start
You don’t need a full-blown mechanic’s garage to pull a seat from your vehicle, just a few tools, a little patience, and a clean spot to work. If you’re the kind of guy who keeps a socket set in the garage and knows where your Torx bits are, you’re already halfway there.
Here’s What You’ll Want On Hand:
- Socket wrench set: Most seat bolts are straightforward, and a basic socket wrench set will get you where you need to go. Expect to use something in the 13mm to 15mm range, though some makes might throw a curveball.
- Torx bits: Torx-head bolts show up a lot, especially in GM and Dodge trucks. Without the right bit, you’ll either strip the bolt or stall out before you even get started.
- Breaker bar: Older bolts don’t always come out clean, especially if you’ve got some rust down there. A breaker bar gives you extra leverage without rounding off the bolt heads.
- Trim removal tool: You’ll probably have to pop off a few plastic covers to get to the bolts. A proper trim tool keeps things clean, with no busted clips and no torn panels.
- A flashlight: There’s always at least one bolt that’s buried in shadow under the seat. A flashlight saves you from playing mechanic in the dark (and dropping tools into the abyss).
- Gloves: Sharp metal edges, rust, and mystery grime are par for the course under most seats. A solid pair of gloves will save your hands and your patience.
One More Thing Before You Wrench:
Disconnect your battery. Trust us, if your seat has airbag wiring, live current is the last thing you want when you start unplugging stuff.
How To Remove A Vehicle Seat From The Base, Step By Step
Removing a seat might sound like a hassle, but once you break it down, it’s a straight shot. Here’s how we do it, no fluff, no filler, just the real process, start to finish.
Step 1: Disconnect The Battery
Before you touch a bolt, pop the hood and disconnect the negative terminal on your battery. This prevents airbag sensors or seat electronics from malfunctioning or firing off while you're working.
Step 2: Slide The Seat All The Way Back
Get access to the front mounting bolts by sliding the seat as far back on its track as it’ll go. This exposes the bolts under the front edge, making them easily accessible with a socket wrench.
Step 3: Remove The Front Bolts
Grab the right socket (usually 13mm or 15mm) and break loose the bolts on both sides at the front of the seat. If they’re rusted or feel stuck, apply a little penetrating oil and use a breaker bar for extra leverage.
Step 4: Slide The Seat Forward And Remove The Rear Bolts
Once the front bolts are out, slide the seat forward to expose the rear bolts near the floorboard. These tend to have less gunk buildup, but they can still be tight, so don’t be shy about using some elbow grease.
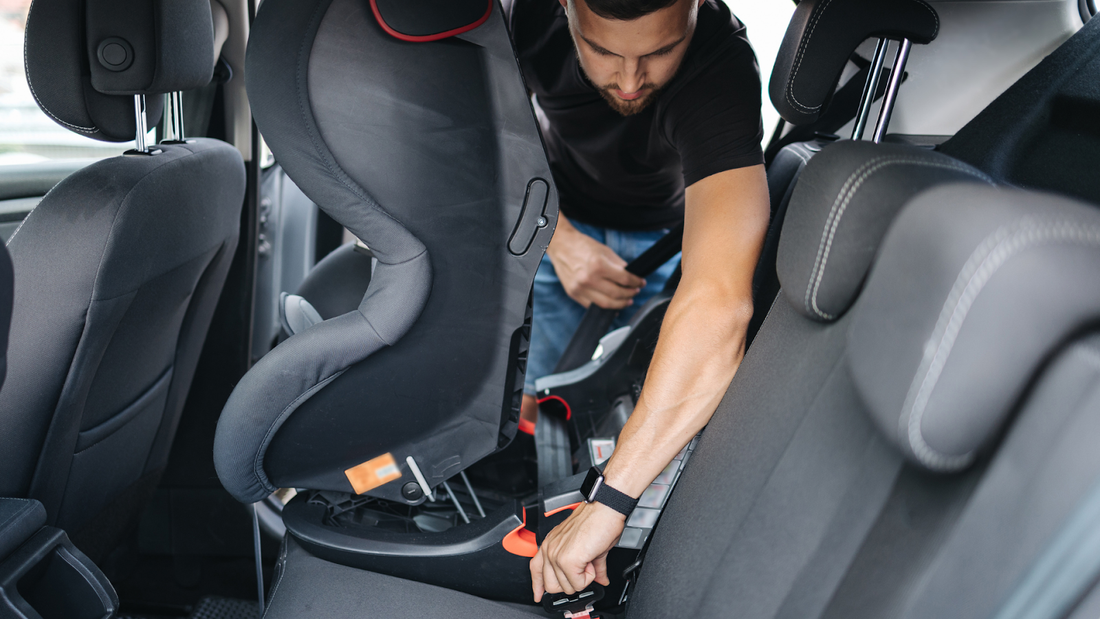
Step 5: Unplug Electrical Connectors
With the seat unbolted, carefully tilt it back or to the side and look underneath. You’ll likely see one or more wiring harnesses, for power, sensors, or airbags, which should be unclipped before the seat is lifted out.
Step 6: Lift The Seat Out
Seats aren’t exactly lightweight, especially those with power. Open the door all the way, grab the seat from both sides, and carefully lift it up and out of the vehicle without scratching up your trim or door panels. That’s it. The seat’s out, and now you’ve got full access to whatever needs fixing, whether that’s the foam, the seat frame, or swapping on one of our factory-matched OEM replacement seat covers.

Common Issues And What To Watch Out For
Pulling a seat sounds simple, and it mostly is, but there are a few things that’ll slow you down if you’re not ready for them. Here’s what we see pop up most often when guys tackle this job in their garage.
Rusty Or Stripped Bolts
Older trucks, especially those that have been exposed to road salt, may have bolts that are rusted solid. If your wrench starts slipping or the bolt head begins to round off, stop right there. A few taps with a hammer can help break the rust seal, or apply penetrating oil and let it sit for a minute. Worst case, you’ll need an extractor, but that’s rare unless the truck’s really been through it.
Hidden Or Covered Mounting Points
Not every seat wants to give up its secrets easily. Some bolt heads are hidden under plastic trim pieces or rubber caps that blend into the floor. If something looks “too clean,” it’s probably hiding a bolt. Use a trim tool, not a flathead screwdriver, so you don’t chew up the covers.
Tight Quarters And Limited Room
If your truck’s console is fixed and the cabin is tight, pulling the seat out can feel like Tetris. Tilt the seat and rotate it out at an angle. It’s easier with a second pair of hands, but it's totally doable solo if you go slow and plan your exit path.
Electrical Connections You Didn’t Expect
Some vehicles have extra wiring you might not notice at first, lumbar controls, airbag sensors, and even seatbelt chimes. Don’t just yank the seat once the bolts are out. Peek underneath and unplug everything before you lift, or you could tear a wire clean off the harness.
Airbag Sensors
This one’s a biggie. Some newer vehicles have side airbags built into the seat. If you don’t disconnect the battery first and unplug things carefully, you can trip an airbag warning light that requires a scanner to reset. Nobody wants to deal with that.
Why Replacing The Whole Seat Isn’t Always The Answer
You’ve got the seat out. You’re staring at it on the garage floor. And yeah, it’s beat to hell. Foam’s chewed up, cover’s split, maybe even the frame’s got a little flex to it. At this point, a lot of guys think, “Screw it, I’ll just buy a new seat.” And sure, you could do that. But should you?
Dealer Pricing Will Knock The Wind Out Of You
OEM seats from the dealer aren’t cheap. In fact, most of them are priced like they come with a free steering wheel or a new transmission. And that’s if the part is even still available. On older models, half the time the dealer just shrugs and tells you it’s discontinued.
Junkyard Seats? Hope You Like Mystery Stains
Going to a salvage yard is a gamble. You might find something usable… or you might end up with a seat that looks fine until you sit down and hear a spring snap under your spine. Plus, who knows what spilled on it, how long it sat in the rain, or what’s living in the foam.
Upholstery Shops Cut Corners, And It Shows
Traditional upholstery shops are hit or miss. Some patch things up halfway decent, but many just throw a piece of foam over the issue, slap on a cover that kinda matches, and call it good. Close enough isn’t good enough, especially when you’ve got to look at it and sit on it every day.

Final Thoughts
Pulling a seat out of your truck or SUV isn’t some intimidating, dealer-only job. It’s a solid Saturday project, and one that puts you back in control of your ride. Whether your cover’s cracked, your foam’s shot, or your seat just doesn’t feel like it used to, you’ve got options that don’t involve writing a massive check at the dealership.
At The Seat Shop, we’re not here to sell you gimmicks or cheap covers that slide around after a week. We build real solutions, including factory-matched leather, vinyl, and cloth seat covers, as well as replacement foam cushions, that install cleanly, fit right, and feel like the original. Fixing your vehicle the right way shouldn’t mean settling for second-best.
Read more:
- Choosing Between Leatherette And Leather Seats: Comfort, Durability, And Value
- How Much Does Car Seat Upholstery Cost? A Complete Guide
- Why Your Worn-Out Seat Foam Might Be The Hidden Cause Of Lower Back Pain While Driving
Frequently Asked Questions About Removing A Vehicle Seat From The Base Safely And Easily
Can I remove a vehicle seat by myself, or do I need help?
You can absolutely do it solo, especially if the seat isn’t powered. For heavier or power seats, having a second person nearby can help avoid scratching your trim or hurting your back.
Will removing a seat trigger any airbag warnings?
If you don’t disconnect the battery first, yes. Removing seats with active airbag sensors while the system is live can trigger a fault code that needs to be reset with a scanner.
Do I need to reprogram anything after putting the seat back in?
No programming is typically needed, but be sure all connectors, especially those for airbags and power, are securely plugged back in before reconnecting the battery.
How do I know if my seat has electrical connectors underneath?
If your seat has power functions, heating, or side airbags, you’ll definitely have connectors underneath. Gently tilt the seat and inspect it before lifting it out.
Is it safe to drive without a seat temporarily installed?
Not recommended. Even moving the truck around the driveway without a secured seat can be dangerous. Always reinstall the seat or finish the repair before driving.
What’s the easiest type of seat to remove, manual or power?
Manual seats are simpler since they don’t have wiring or motors. Power seats are still doable, but take a little extra care with connectors and overall weight.
Can I reuse the old bolts when reinstalling the seat?
Yes, in most cases. Just make sure they’re not stripped or rusted, if they are, swap them with new OEM-style bolts for safety.