
Seat Bottom General Installation Guide
Introduction
This document will serve as a general installation guide for replacing a bottom seat cover (or foam cushion). There are unique aspects of any installation based on the manufacturer, seat style, power options, etc. The goal of this guide is not to provide exhaustive coverage of all possibilities, but simply to overview the general process that one would follow when attempting installation.
Table of Contents
Step 1. Documenting the Process
- Snap some quick “before” photos of the seat(s) you’re working on.
- Keep your camera app handy and take photos as you go. You may find it helpful to refer to them during the installation process.
Step 2. Removing the Seat(s) from the Vehicle
- To access the front two bolts, move the seat as far back as it will go (away from the steering wheel).
- Unfasten the front two bolts/nuts:
- To access the rear two bolts/nuts, move the seat as far forward as it will go (towards the steering wheel).
- Unfasten the rear two bolts/nuts.


The following are common bolt styles used to secure the seat frame to the vehicle (see Figure 4 for reference):
- Hex Nut.
- Torx Nut.
- Torx Screw.
You can use standard or metric sockets to remove both Hex Nuts and Torx Nuts. To remove Torx Screws, you'll need the proper size Torx bit.
Once the bolts are removed:
- Place the seat in a mid-point position (not all the way forward or all the way back). See Figure 5 for reference.
- Ensure the seat back is upright and any lumbar support (if applicable) is set in a neutral/relaxed position (fully retracted into the seat).
- If your vehicle has power seats, raise the seat to provide more clearance to work underneath it.
- Disconnect all electrical and airbag connections (these connections are located in the floorboard and connect to your seat). Each connection type is unique to prevent re-wiring mistakes. However, feel free take a photo of the connections before disassembling them for reference during re-installation.
- Note: Do not turn on the ignition with the seat unplugged as it may trigger a warning light on the dashboard and require a mechanic to clear it.
- Carefully lift the seat out of the vehicle and place it on a sturdy workbench.
- Note: The seat frame is heavy and has sharp edges and will easily scratch the surface it is on.


Step 3. Removing the Seat Controls
If you have a manual seat, there may be one or more plastic pieces used to adjust the seat. If you have a powered seat, there may be a plastic side panel, typically containing power control switches, lumbar knobs, and/or levers that control the angle of the seat back.
- Unscrew any screws that hold the panel or manual levers/knobs to the seat frame.
- Disengage any plastic hooks or catches that still attach the panel to the seat, and disconnect any electric connections attached to the panel. See Figure 6 for reference.

Step 4. Detaching Plastic J Clips from the Seat Pan or Frame
- Start by using a pry tool or screwdriver to unhook the plastic J clips that secure the upholstered cover to the metal seat pan or frame.
- Once all the clips have been detached, unroll the cover by turning it inside out, starting from the front and moving towards the back.
- Note: If the seat backrest frame passes through the bottom seat cover, it will be necessary to remove the backrest from the seat to continue. See Figure 7 for reference.
- With the J clips detached and the cover unrolled, you should now be able to remove the cover and cushion from the seat pan/frame.
Step 5. Detaching the Seat Cover from the Foam Cushion
Note: If you are not reusing your existing foam cushion or seat cover and your seat does not have heating or ventilation capabilities, you can proceed to Step 6.
- Locate the attachment method anchor points used to secure the seat cover to the foam cushion.
- Based on the attachment method, follow the appropriate steps to detach the cover from the cushion:
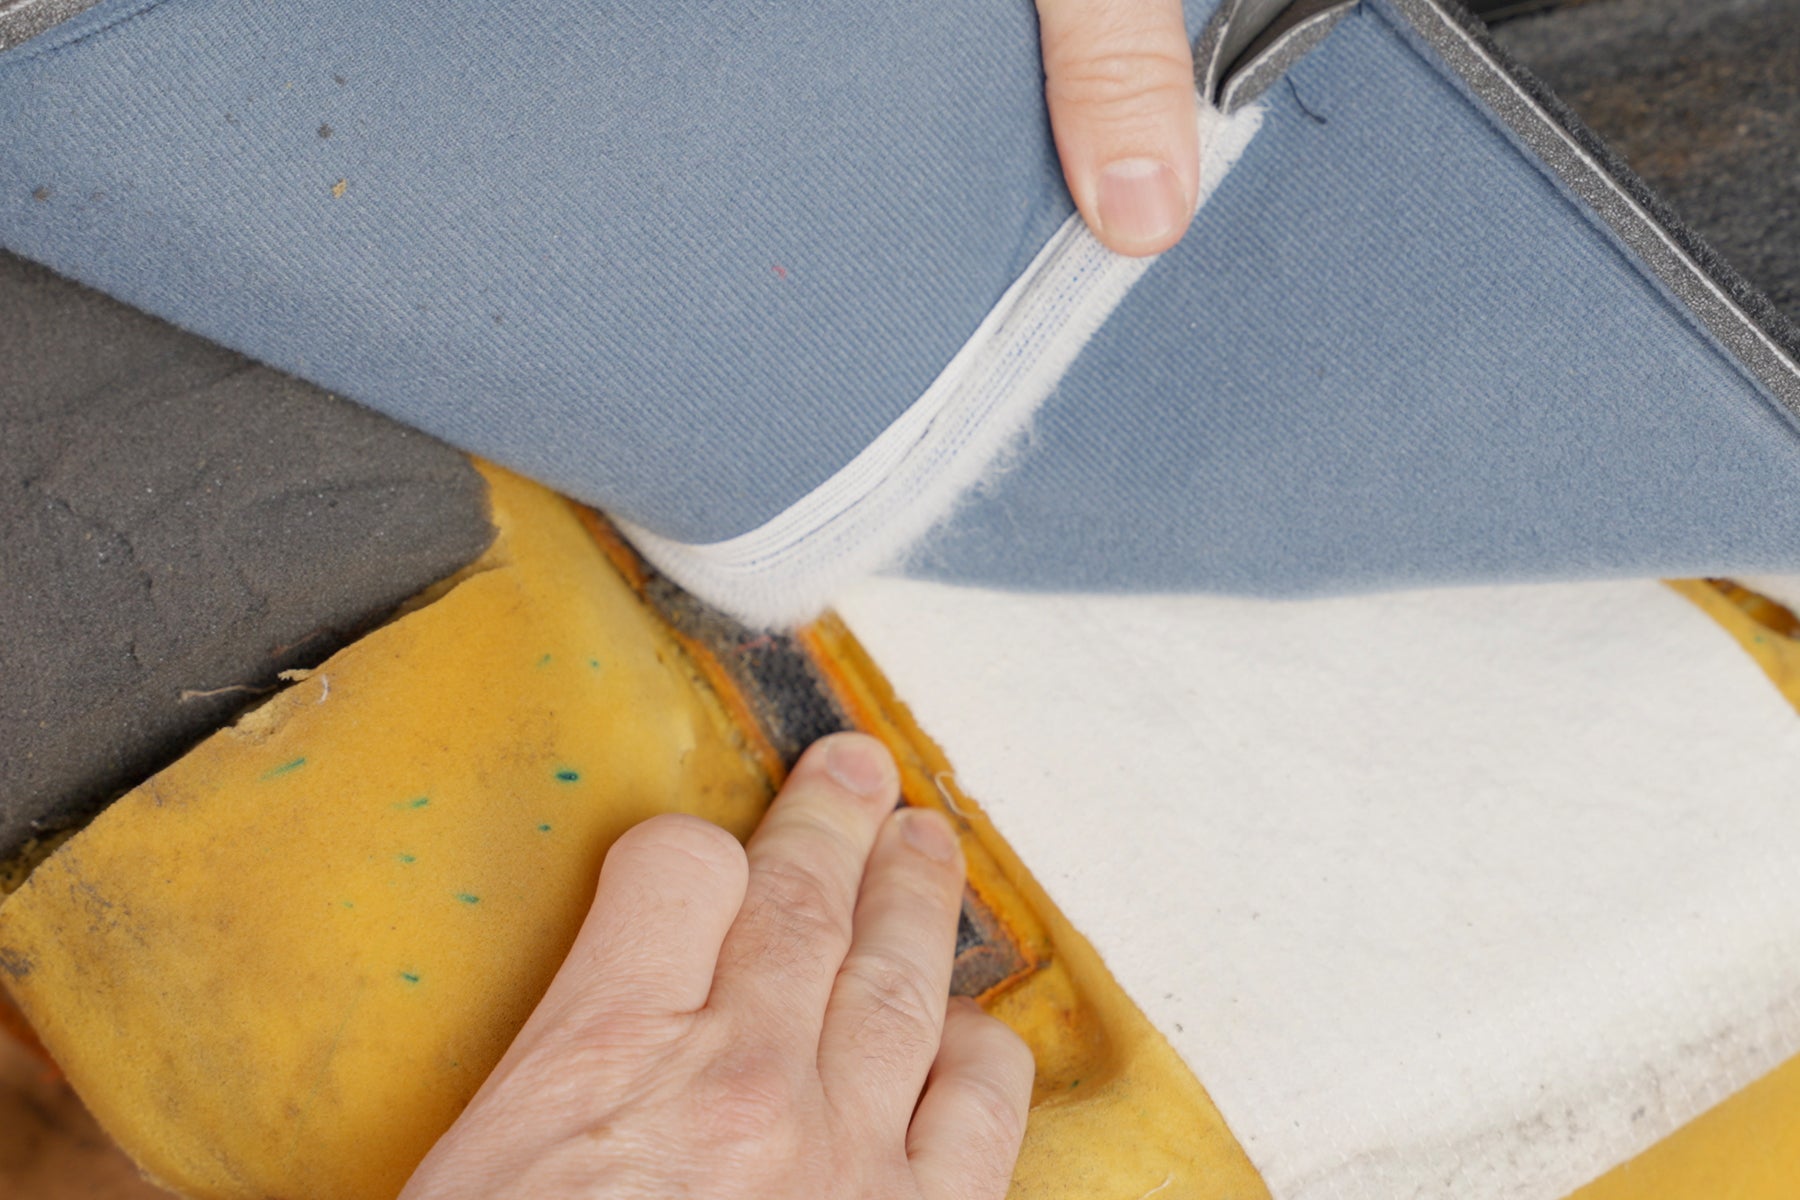
- Velcro: Carefully separate the Velcro strips a few inches at a time, holding down on the bottom strip to prevent tearing it from the foam cushion. See Figure 8 for reference.
- Retainer Clips: Gently pull the plastic strips from the retainer clips, being mindful not to rip the clips from the foam cushion. See Figure 9 for reference.
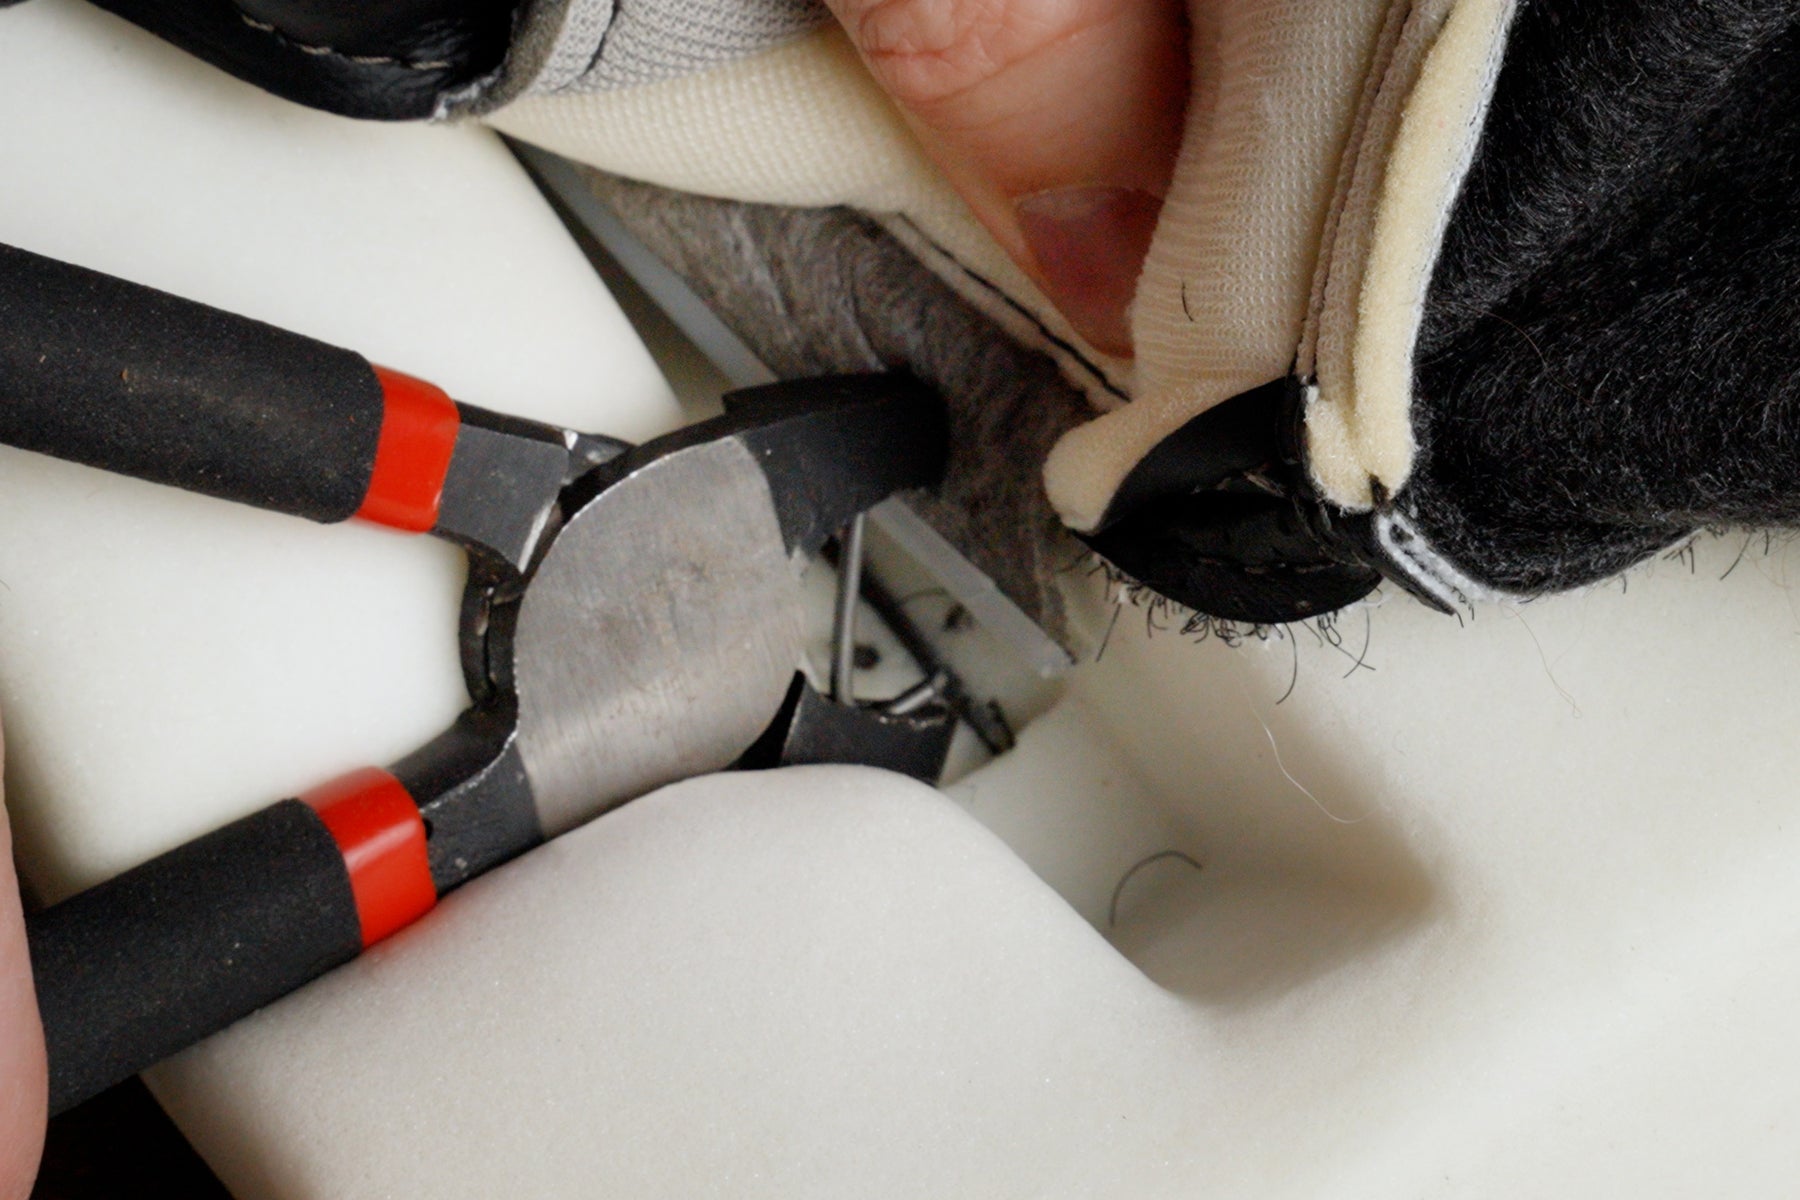
- Hog Rings: Carefully clip the hog rings to separate the hog ring strip on the cover from the hog ring bar inside the foam cushion. See Figure 10 for reference. Check for any broken pieces of hog rings in the cushion and remove them to prevent any damage to both the cushion and cover.
Note: Some rare seat covers may have metal bars that slide through cloth loops in the cover and attach to the foam cushion using hog rings. These metal bars should be re-used with the new seat cover.
- If your seat has a heating element and it needs to be removed, carefully peel it off the foam surface to avoid damaging the cushion. You can use spray adhesive to attach the heating element to the new foam cushion.
- If you are replacing your foam cushion, and your seat is ventilated (meaning it is equipped with heating and cooling functions), you may need to detach the heating/cooling mechanism from the foam cushion for use with the new foam cushion. Ventilated parts may be glued onto the surface of the foam cushion, so remove them carefully to avoid damaging any parts.


Step 6. Attaching the Seat Cover to the Foam Cushion
- Turn the replacement seat cover inside out and align the attachment methods on the cover with the foam cushion.
- Securely fasten the attachment methods:
- Velcro: Firmly press down on all the seams to secure the Velcro. See Figure 11 for reference.
- Retainer Clips: Hold the plastic strip attached to the seat cover and press down firmly on either side of each clip in the foam cushion until you hear it snap into place. See Figure 12 for reference.
- Hog Rings: Use hog ring pliers to run the edge of a hog ring through the fabric that attaches the plastic strip to the seat cover. Firmly press down on the hog ring until it reaches below the hog ring bar in the foam cushion, then squeeze the pliers to close the ring around both the plastic strip and bar. See Figure 13 for reference.
- Ensure that the center panels of the seat cover look straight, and the material is smooth. Properly set attachments are essential for a great-looking installation. See Figure 14 for reference.
- Roll the seat cover over the edge of the foam cushion:
- Start by cupping a front corner of the foam cushion with one hand and begin rolling (not pulling) the seat cover down, compressing the foam cushion to make it easier. See Figure 15 for reference.
- Repeat this step for the other front corner of the seat.
- Finally, roll the back of the seat cover over the foam cushion.


Step 7. Attaching the Plastic J Clips to the Seat Pan or Frame
- Start by attaching the front clip in the center and moving towards the front corners, using a rolling motion to snap the clips into place. See Figure 16 for reference.
- Repeat the process for the back and sides of the seat.
- Note: Be careful not to pull on the clip itself, as it may tear off the material. Instead, hold the seat cover near the clip to pull it towards its anchor point, compressing the foam cushion will make this step easier.
- If necessary, use a screwdriver or pry tool to guide clips through narrow openings in the frame.
- Before proceeding, inspect the seat cover to ensure a satisfactory fit and make any necessary adjustments. Small wrinkles or ripples in the material are normal at this stage and will be addressed before installing the seat back into the vehicle. See Figure 17 for reference.


Step 8. Trimming Material for Seat Control Compatibility
Please be aware that not all seat covers provided by The Seat Shop come with pre-cut holes due to the varying seat options available. In case the installation of your seat cover requires cutting, follow the steps outlined below to make the necessary modifications to complete the installation of your unique cover.
- Identify the locations where cuts will be made, using a marking tool such as chalk. If your seat uses a plastic side panel, place the side panel against the seat and determine the required cutout location. See Figure 18 for reference.
- Using a closed pair of scissors or a blade, puncture the material at the center of the marked area. It is recommended to start with a small cut and gradually trim more, if necessary, to minimize the risk of over-cutting. See Figure 19 for reference.
- Cut away the material in small sections, checking the placement of the side panel or knobs/levers multiple times to ensure the correct amount of material is being removed. You can cut away the foam backing without cutting the exposed material, giving you more room to work on making precision cuts. See Figure 20 for reference.
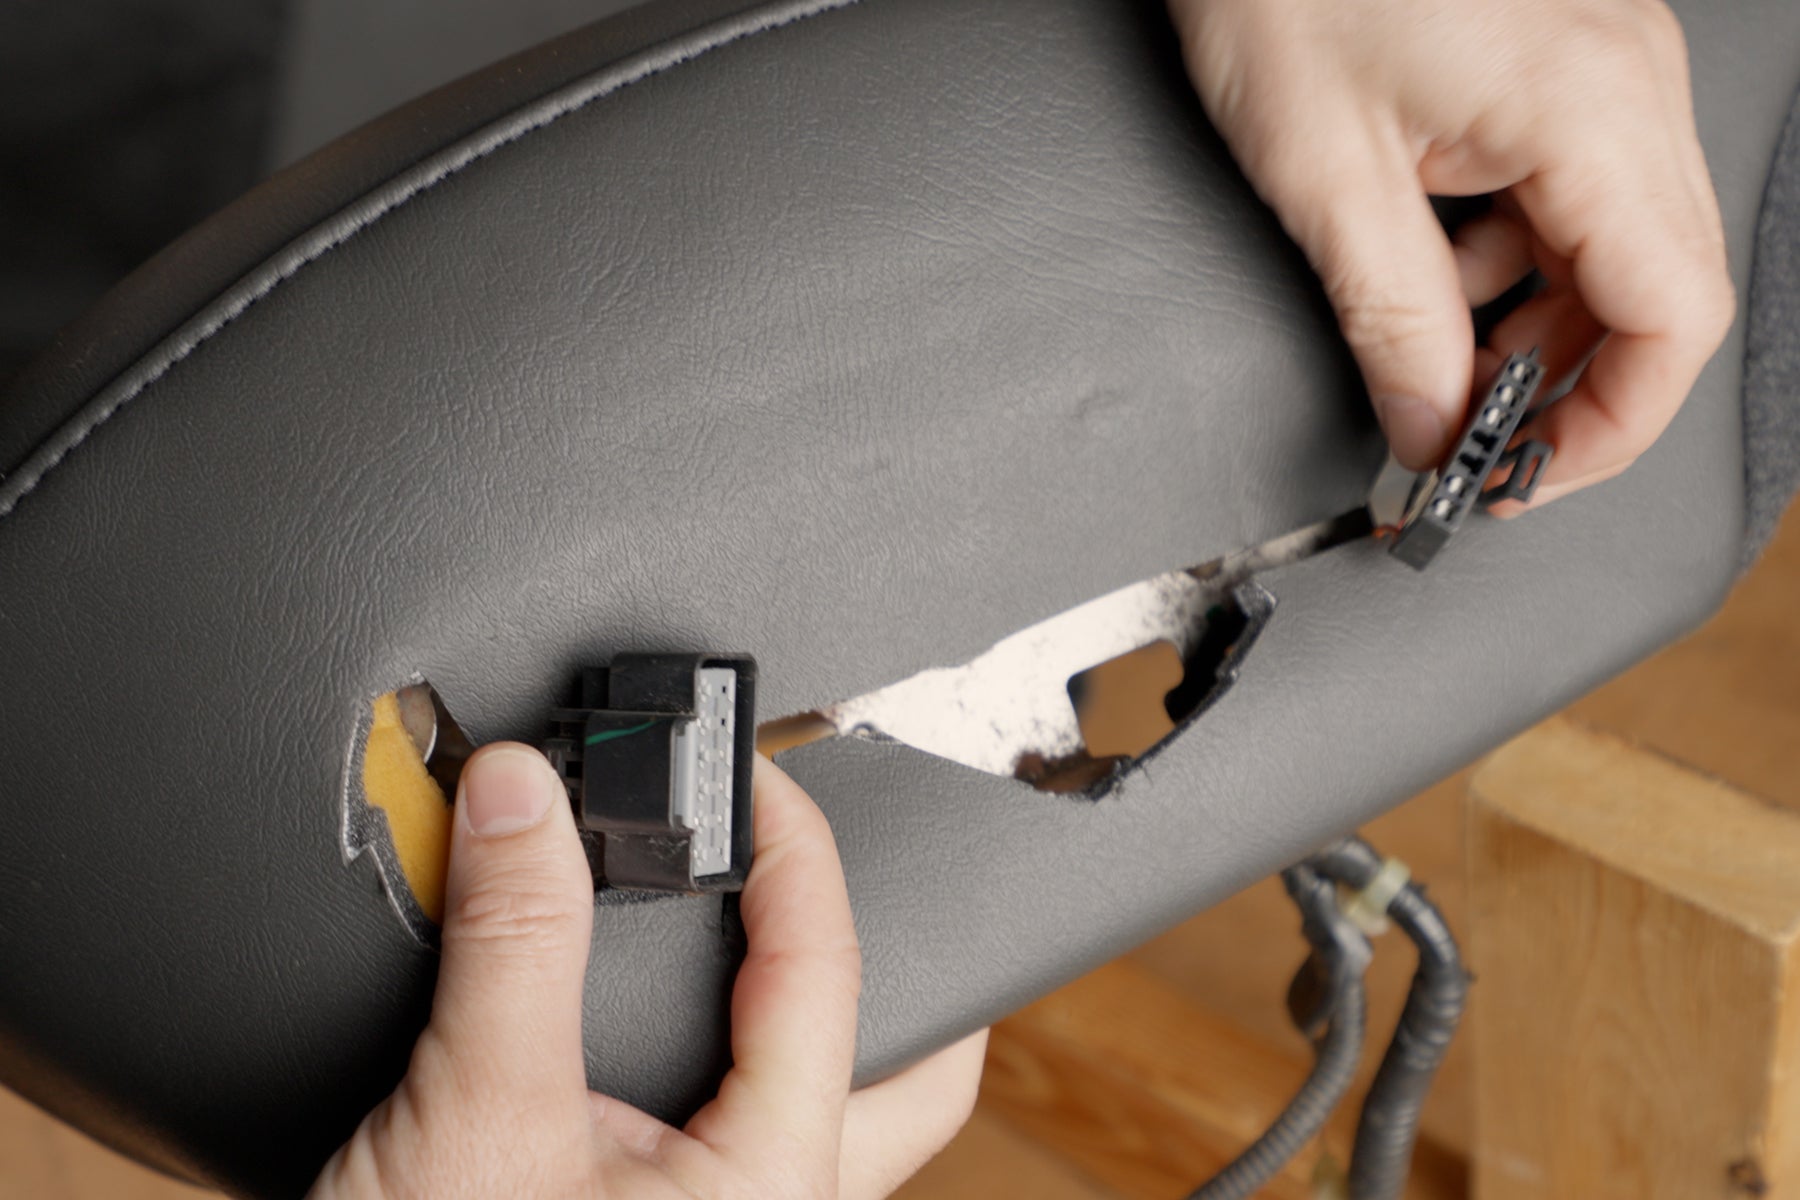
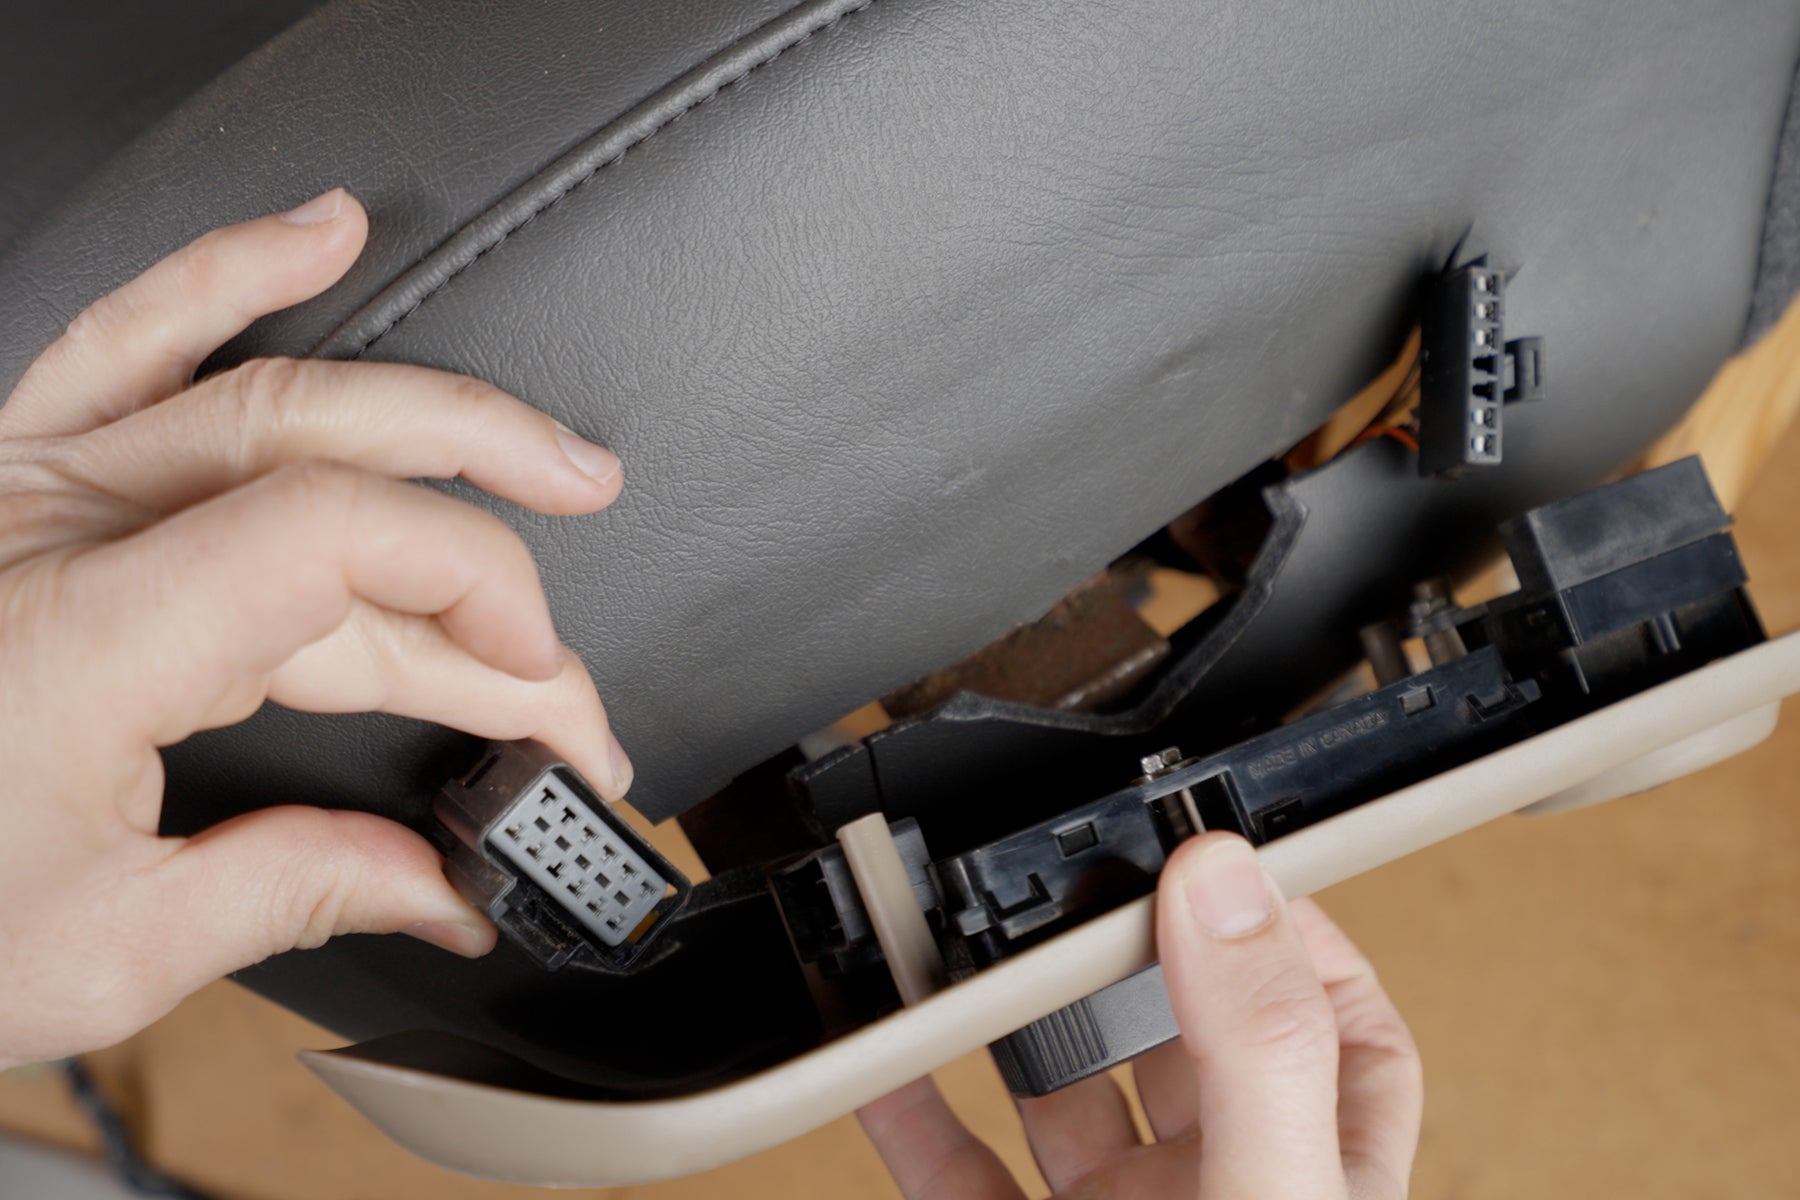
- Once the required material is removed, feed through any control connections and attach them to the side panel before securing the bezel with screws. See Figure 21 for reference.
- Finally, reattach any control switches, knobs, or levers.


Step 9. Using Steam to Smooth Out Any Remaining Wrinkles
If you have leather seats, using steam is a crucial step toward ensuring that your new leather seat cover fits tight and smooth on the foam cushion, without any unwanted wrinkles. Whether you are using a commercial steamer or a simple garment steamer, make sure to have it nearby and ready for use.
- If using a commercial steamer, follow the manufacturer's instructions to prepare it. If using a garment steamer, fill the water tank and allow it to heat up.
- Once the device is ready, direct the steam over the problem area on the seat, but be careful not to apply too much steam in one spot. Aim to only steam the area for a few seconds at a time, and then move on to another section of the seat. See Figure 22 for reference.
- After steaming each section, test the material to ensure it’s cool enough to touch. Then, use your hands to massage the material, pushing any remaining wrinkles toward the edge of the seat. See Figure 23 for reference.
- Be sure to use a rag to wipe away any excess water that may have accumulated. You can also carefully use a heat gun to dry off excess water.
- Note: Excessive heat from a heat gun can cause damage to the seat cover, particularly to the vinyl or carpet areas. If using a heat gun, be sure to keep the heat gun moving so as not to apply too much heat in one spot.
- Repeat the steaming and massaging process until all wrinkles have been smoothed out, inspecting the seat cover to ensure you're happy with the fit and smoothness of the material. Make any final adjustments as needed.


Step 10. Installing the Seat in the Vehicle
- Gently lower the seat into the vehicle, aligning it with the seat tracks. Make sure the seat easily fits in the floor bolts.
- Lean the seat forward or back as necessary to reconnect all electrical connections.
- Note: It is important to double check that all electrical and airbag connections (if applicable) are securely attached. If the vehicle's dashboard warning light turns on after the seat has been installed, or if the seat does not operate properly, this may indicate a missed connection.
- Once all electrical connections have been secured, position the seat back in its original place and tighten all bolts/nuts that secure it to the floorboard. If necessary, reattach the seat belt, ensuring that it is securely fastened.
Step 11. Enjoy Your Ride Again!
Snap a few photos of the finished product! Tag us using your favorite social media channel or upload them here.
If you have any questions, we are here to help.
- Give us a call at: 214-710-2565
- Email us at: sales@theseatshop.com
- Visit us online at: www.theseatshop.com
- Choosing a selection results in a full page refresh.